
在这个博客中,我将解释Angular中的几个高级组件和机制,它们增强了灵活性、可重用性和性能。
通过熟悉这些高级组件和机制,您可以提高您的Angular开发技能,并在应用程序中利用灵活性、可重用性和性能优化的能力。让我们开始吧!
NgContent
NgContent,或Angular中的内容投影,通过将内容从外部投影到组件中,可以实现灵活和可重用的组件。当您希望动态地将内容传递给组件时,通常会使用它。
还有Input和Outputoperator,它们的作用与NgContent组件相同。输入操作符允许组件从外部接收数据,而输出操作符允许组件向外部发出事件。所以这两个操作符只处理数据。当涉及到NgContent时,它用于投影组件的内容,如HTML代码,您可以动态指定它们。通过这种方式,增加了组件的灵活性,并确保了可重用性。
让我们从一个简单的例子开始。想象一下,您想要创建一个包含标题、作者姓名、日期和内容的博客文章组件。您可以创建这样的组件:
// Blog Post Component
@Component({
selector: 'app-blog-post',
  template: `
    <div class="blog-post">
      <h2>{{ title }}</h2>
      <p class="author">Author: {{ author }}</p>
      <p class="date">Date: {{ date }}</p>
      <ng-content select=".blog-post-content"></ng-content>
      <ng-content select=".blog-post-sidebar"></ng-content>
    </div>
  `,
})
export class BlogPostComponent {
  @Input() title: string;
  @Input() author: string;
  @Input() date: string;
}
在此组件中,<ng content></ng content>标记用于指定内容的投影位置。使用该组件时,可以按如下方式投影内容:
// Home Component
@Component({
selector: 'app-home',
template:`
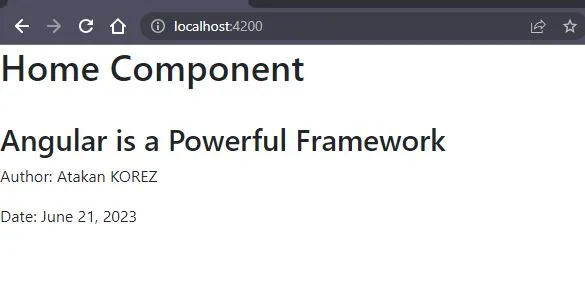
<h1> Home Component</h1>
<br>
<app-blog-post title="Angular is a Powerful Framework" author="Atakan KOREZ" date="June 21, 2023">
<p>Angular is a powerful framework for building modern web applications.</p>
<p>...</p>
</app-blog-post>
`
})
export class HomeComponent {
}
Output:
多个NgContent
此外,让我们提供一个多ng内容使用的示例。假设您希望将内容投影在博客文章标题的下方和旁边。为了实现这一点,您可以使用select关键字更新组件。此外,在没有选择任何内容的情况下发送的数据由NgContent接收,它没有选择器关键字(如果有的话)。示例如下:
// Blog Post Component
@Component({
selector: 'app-blog-post',
template: `
<div class="blog-post">
<h2>{{ title }}</h2>
<p class="author">Author: {{ author }}</p>
<p class="date">Date: {{ date }}</p>
<ng-content select=".blog-post-content"></ng-content>
<ng-content select=".blog-post-sidebar"></ng-content>
<ng-content></ng-content>
</div>
`,
})
export class BlogPostComponent {
@Input() title: string;
@Input() author: string;
@Input() date: string;
}
//Home Component
@Component({
selector: 'app-home',
template:`
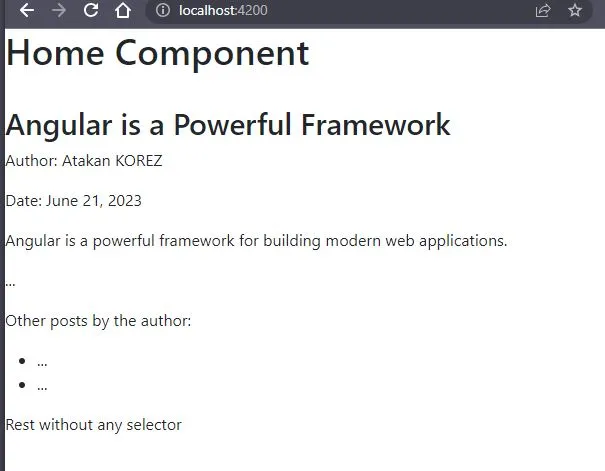
<h1> Home Component</h1>
<br>
<app-blog-post title="Angular is a Powerful Framework" author="Atakan KOREZ" date="June 21, 2023">
<div class="blog-post-content">
<p>Angular is a powerful framework for building modern web applications.</p>
<p>...</p>
</div>
<div class="blog-post-sidebar">
<p>Other posts by the author:</p>
<ul>
<li>...</li>
<li>...</li>
</ul>
</div>
Rest without any selector
</app-blog-post>
`
})
export class HomeComponent {
}
Output:
NgContainer
NgContainer充当占位符,动态地包含在Angular中配置的图像。它在创建和管理重复出现的元素时提供了额外的灵活性,尤其是在与*ngFor等构造一起使用时。
你可以说span元素也可以用于这个过程,你可能会问为什么我们使用NgContainer而不是span。你说得对,但当性能突出时,与使用span相比,NgContainer是一种性能非常好的方法。让我试着用下面的例子来解释这个事实。
@Component({
  selector: 'app-root',
  template: `
    <h1> App Component</h1>
    <br>
    <div class="mt-5">
      <ul>
        <span *ngFor="let product of products">
          <li *ngIf="product.available">{{ product.productName }}</li>
        </span>
      </ul>
    </div>

    <div class="mt-5">
      <ul>
        <ng-container *ngFor="let product of products">
          <li *ngIf="product.available">{{ product.productName }}</li>
        </ng-container>
      </ul>
    </div>
  `,
})
export class AppComponent {
  products: any[] = [
    { productName: 'Pencil', available: true },
    { productName: 'Book', available: false },
    { productName: 'Notebook', available: true },
    { productName: 'Eraser', available: false },
    { productName: 'School Bag', available: true },
  ];
}
在上面的示例代码中,Products数组的元素根据其可用状态在页面上列出。使用span和ngContainer列出了相同的元素。到目前为止,一切都很正常,但当我们检查页面的HTML输出时,就会出现差异。
输出:
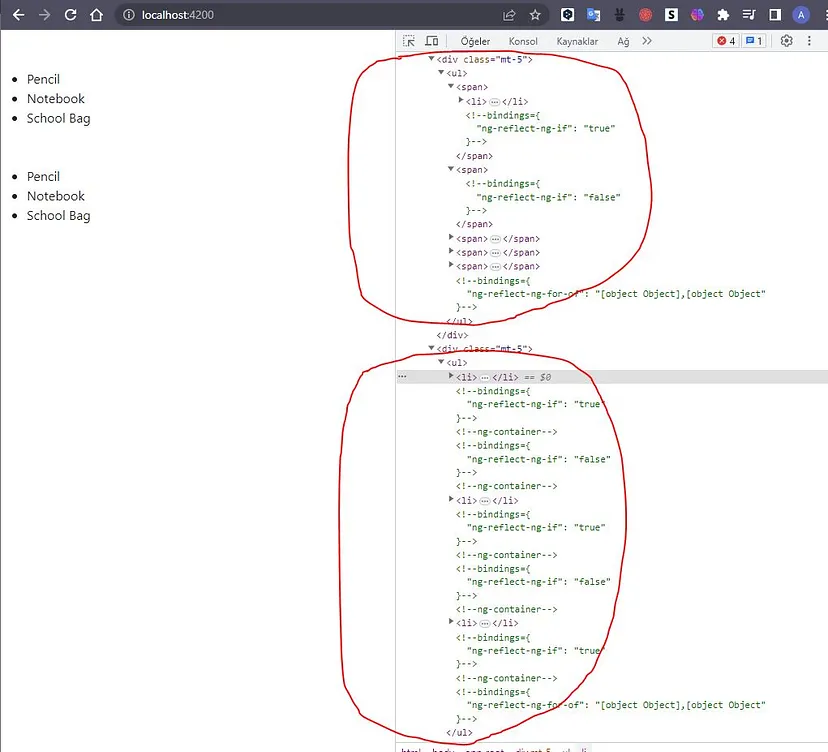
从输出中可以看出;当使用span时,5 lielement是在不注意可用属性的情况下创建的,而使用ngContainer只会创建与可用元素数量一样多的元素。这样可以使HTML代码更干净、更高效。
在这些关键信息之后,我希望您从现在起永远使用ngContainer:)
NgTemplate
NgTemplate允许在Angular中的HTML模板中创建部分或区域。NgContainer和NgTemplate在渲染行为方面有区别。与自动渲染的NgContainer不同,NgTemplate需要显式调用并包含在渲染过程中才能可见。
@Component({
  selector: 'app-root',
  template: `
    <h1> App Component</h1>
    <br>
    <ng-container *ngTemplateOutlet="template1">
      Container info...
    </ng-container>
    <ng-template #template1>
      Template info...
    </ng-template>
  `,
})
export class AppComponent {
}
Output:
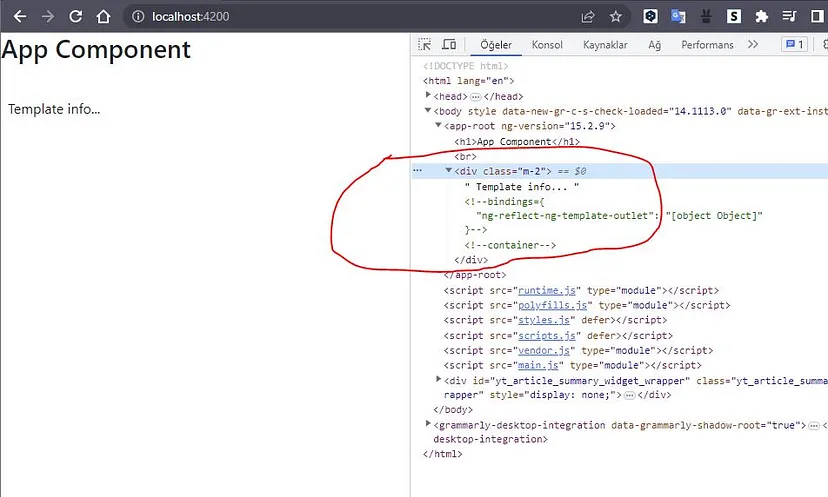
从Output中可以看到,ngTemplate覆盖了ngContainer。此外,在Angular项目中,NgContainer经常与ngIf和ngSwitch等结构一起使用。因此,以可控的方式容易地处理向页面操作添加/移除新元素。
//ngIf example

<ng-template #myTemplate>
  <p>This template is rendered conditionally.</p>
</ng-template>

<div *ngIf="showTemplate; then myTemplate"></div>

//ngSwitch example

<ng-template #templateOne>
  <p>This is template one.</p>
</ng-template>

<ng-template #templateTwo>
  <p>This is template two.</p>
</ng-template>

<div [ngSwitch]="value">
  <div *ngSwitchCase="'A'">
    <ng-container [ngTemplateOutlet]="templateOne"></ng-container>
  </div>
  <div *ngSwitchCase="'B'">
    <ng-container [ngTemplateOutlet]="templateTwo"></ng-container>
  </div>
</div>
ngTemplateOutletContext:我们可以使用ngTemplateOutlet Context向ngTemplate提供绑定数据。这允许我们将值传递给ngTemplate内部的变量。以下是一个示例:
<ng-template #myTemplate let-name="name">
  <p>Hello, {{ name }}!</p>
</ng-template>

<ng-container [ngTemplateOutlet]="myTemplate" [ngTemplateOutletContext]="{ name: 'Atakan' }"></ng-container>
在上面的示例中,ngTemplateOutletContext用于将值“Atakan”分配给名称变量,然后在ngTemplate中使用该值。这种控制机制使我们能够以更灵活和动态的方式使用ngTemplate。
Renderer2
Renderer2是一种服务,用于以独立于平台的方式执行DOM操作,而不是直接操纵DOM。Renderer2遵循Angular的安全模型,并确保跨平台兼容性,这使得它在使用Angular Universal等平台时特别有用。以下是使用Renderer2而不是JS或JQuery来操作DOM的一些优点:
- 平台独立性:Renderer2为执行DOM操作提供了一个特定于平台的后端,允许Angular应用程序在不同的平台上工作。
- 安全性:Renderer2的操作符合Angular的安全模型。Renderer2允许安全的DOM操作,而不是直接的DOM操作。
- 性能和优化:Renderer2优化了Angular的更改检测机制,并更有效地应用更改。更改可以在单个更新周期内分批进行,以提高性能。
以下是一个示例:
@Component({
  selector: 'app-example',
  template: `
    <button (click)="changeColor()">Change Color</button>
  `,
})
export class ExampleComponent {
  constructor(private elementRef: ElementRef, private renderer: Renderer2) {}

  changeColor() {
    const button = this.elementRef.nativeElement.querySelector('button');
    this.renderer.setStyle(button, 'background-color', 'blue');
    this.renderer.setStyle(button, 'color', 'white');
  }
}
在上面的示例中,我们创建了一个名为ExampleComponent的组件。Renderer2被注入到组件的构造函数中。changeColor()方法更改按钮的背景色和文本色。DOM操作是通过Renderer2执行的,允许安全地分配样式属性。因此,使用Renderer2可以确保Angular应用程序更加安全、可移植和高性能。
结论
在这个博客中,我解释了Angular中增强灵活性、可重用性和性能的高级组件和机制。通过利用这些组件和机制,开发人员可以实现灵活和可重用的组件、干净高效的代码、条件呈现和安全的DOM操作,从而增强Angular应用程序。
通过将这些高级组件和机制集成到Angular项目中,您可以解锁新级别的灵活性、可重用性和性能优化。利用NGContent、NgContainer、NgTemplate和Renderer2的强大功能,轻松构建健壮、动态的应用程序。
- 登录 发表评论