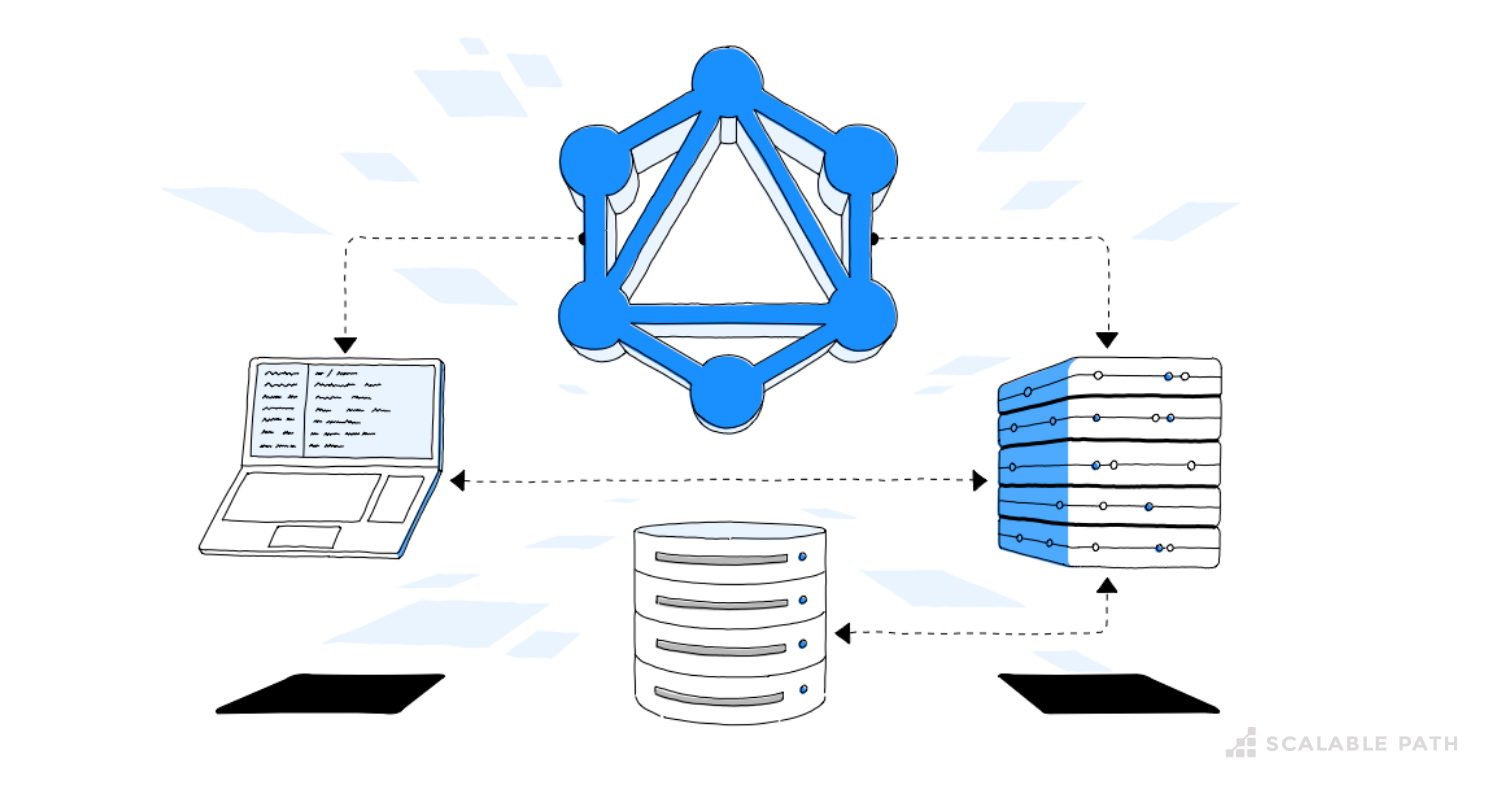
In part two of this tutorial series, we’re going to look at the key features of GraphQL and how to integrate it with PostGraphile to enhance the back-end of our full-stack application.
In part one, we covered how to approach building a GraphQL API with TypeScript and Node.js as well as the key benefits of this architecture. If you missed it, check out how we set up the project and bootstrapped our code by installing dependencies and configuring our data model.
Table Of Contents
- 什么是GraphQL?
- 使用PostGraphile与GraphQL集成
- GraphQL游乐场
- GraphQL API文档
- 在GraphQL Playground中编写查询
- 编写GraphQL变体
- 为后端处理自定义业务逻辑
- 测试我们的GraphQL API
- 总结和我们的全栈应用程序教程中的下一步:
What is GraphQL?
简而言之,GraphQL充当了获取和变异数据的层。它在前端和后端都与语言无关(例如JavaScript、Java、C#、Go、PHP等),是客户端和服务器通信之间的桥梁。
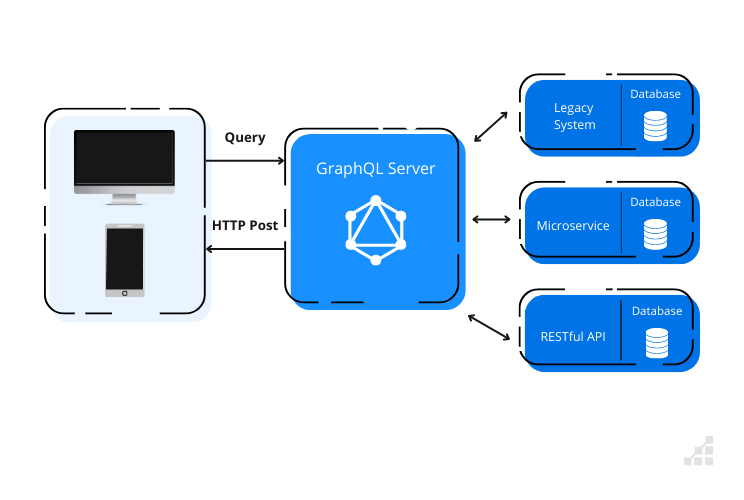
The goal of GraphQL is to provide methods for retrieving and modifying data. To provide this function, GraphQL has several operations:
It’s important to mention that GraphQL isn’t a framework/library, nor a database implementation/query language for the DB. Rather, it’s a specification powered by a robust type system called Schema Definition Language (GraphQL SDL) described in its specs. It serves as a mechanism to enforce a well-defined schema that serves like a contract establishing what is and what isn’t allowed.
It’s a wrong assumption to think that GraphQL is a database implementation or a query language tied to any particular database. Although it’s common to see that being translated to DB interactions, it’s possible to use GraphQL even without having any sort of DB (ex., you can set up a GraphQL layer to expose and orchestrate different REST APIs endpoints).
Using PostGraphile to Integrate with GraphQL
There are a few ways to set up a GraphQL API in Node.js. These options may include:
Alternatively, you can build your own server with custom resolvers and a schema definition. While there are pros and cons for each method, we’ll use PostGraphile in this tutorial. We’ve made that choice because it provides an instant GraphQL API based on the DB schema.
What Is PostGraphile?
PostGraphile is a powerful tool that makes it easy to set up a robust GraphQL API relatively quickly. According to the official documentation:
“PostGraphile automatically detects tables, columns, indexes, relationships, views, types, functions, comments, and more — providing a GraphQL server that is highly intelligent about your data, and that automatically updates itself without restarting when you modify your database.”
This makes PostGraphile a great option for developers because it enables them to build fast, reliable APIs. Some of the key features that make this possible are:
Configuring PostGraphile
There are two ways of integrating PostGraphile into our project: via PostGraphile CLI or through a middleware. For this project, we’ll use a middleware.
Now that we have an overview of GraphQL and how PostGraphile can be helpful in our demo project, let’s go ahead and install the PostGraphile dependency in our project.
npm install postgraphile@^4.12.9
To use PostGraphile in our application, we need to import it like our other dependencies. The import can be added to the top of the App.ts file:
import postgraphile from 'postgraphile'
After that, all we need to do to complete the setup is to enhance our App.ts and bootstrap our Express server with PostGraphile Middleware. To do that, replace this code section:
/**
* This is our main entry point of our Express server.
* All the routes in our API are going to be here.
**/
const App = () => {
 const app = express()
 app.use(express.json())
With this:
const pgUser = '*** INSERT YOUR POSTGRESQL USER HERE ***'

/**
* This is our main entry point of our Express server.
* All the routes in our API are going to be here.
**/
const App = () => {
 const app = express()
 app.use(express.json())
 app.use(postgraphile(`postgresql://${pgUser}@localhost/catalog_db`, 'public', {
   watchPg: true,
   graphiql: true,
   enhanceGraphiql: true,
 }))
We’re basically configuring the PostGraphile middleware in our server.
Now, if you restart the server and hit the http://localhost:8090/graphiql in your browser, you’re going to see some really interesting stuff! We’ll dig into all of that in the next section.
Note: if, when restarting the server, you see:
Then make sure the user specified in the const pgUser = is valid and that you have the admin privileges for changing the Postgres DB Schema.
GraphQL Playground
GraphQL Playground is a sort of IDE for exploring and interacting with a GraphQL server. It comes with an interactive UI that can run on the browser to where you can build and test queries/mutations and explore the GraphQL schemas.
What you are seeing is an enhanced version of GraphiQL shipped with PostGraphile. While it’s out of the scope of this tutorial to dive deep into the GraphQL playground, we’ll cover some of the key features that it provides.
GraphQL API Documentation
Our GraphQL Playground can also serve as an API documentation with the powerful schema introspection feature. Let’s take a look.
First, in the top right-corner, click on the “< Docs” option. This will open the Documentation Explorer:
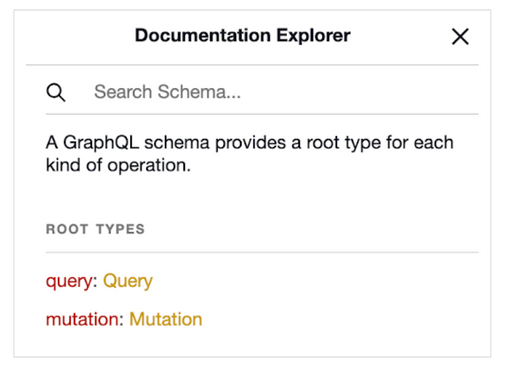
There are two root types enabled: Query and Mutation. Let’s explore the Query type.
If you scroll down, you’ll see many options available to use. In TypeORM, we defined the entities to be added to the PostgreSQL server. The PostGraphile middleware is able to automatically expose these entities to GraphQL, allowing us to access them through GraphiQL.
Let’s take a look at the allCategories query as an example:
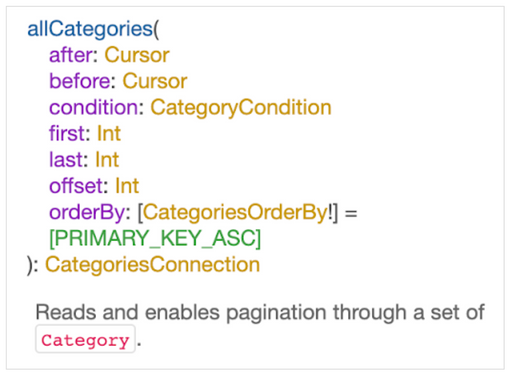
By clicking on the allCategories hyperlink, you can see the details of that query:
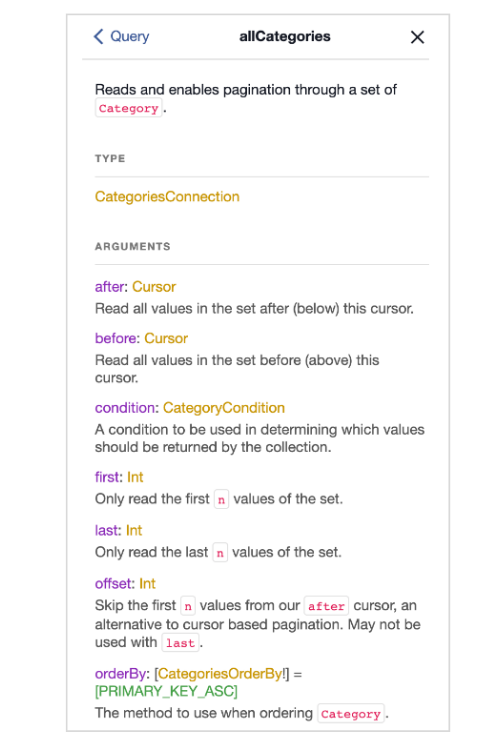
This window displays the different methods you can use to work with the query results.
Notice that GraphQLsupports Cursor (after, before) and Offset (first/last, offset) based pagination, Ordering and Filters (condition), with all of that supported out of the box!
As for the Mutation type, you have access to create, update and delete utilities for all of our entities!
In the following sections, we’ll explore some of the fundamental features of a GraphQL API: writing Queries and Mutations.
Note: this article is not going to cover all the details of writing Queries and Mutations. If you’re interested in this, there are some great resources on the official GraphQL Foundation website.
Writing Queries in GraphQL Playground
Now that we’ve explored the allCategories query in the docs, let’s make an actual query. To do it, you can use the query editor located in the middle section of the GraphiQL playground:
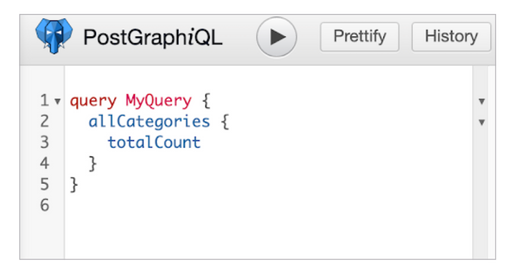
Click the “Execute Query” button (the one with the “Play” icon located in the center of the top section). You should see a response that looks like this:
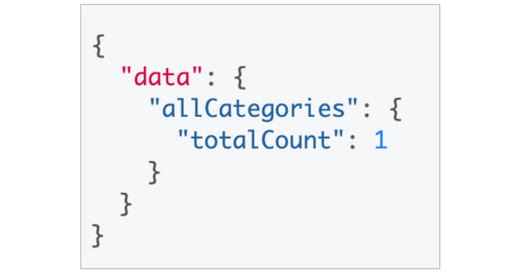
Here, we’ve basically created a query named “MyQuery” (though you can replace it with any other name, like “FetchCategories”) and specified that we wanted the totalCount of the allCategories query.
Now, since we seeded our DB earlier with some test data, let’s play around with some queries:
# Retrieves a list of products and their base information
query ListProducts {
  allProducts {
    nodes {
      id
      sku
      description
      categoryId
      subcategoryId
      uomId
    }
  }
}
In this query, allProducts is the name of the object returned by the query. You can think of the nodes section as a list of fields we want to see returned. In this example, we are getting all of the products and displaying their id, sku, description, categoryId, subcategoryId and uomId fields.
What if we want some information about a relationship? No problem! The query below shows an example of joining the products table with the uom table, based on the uomId field:
# Retrieves a list of Products with they Category and Uom info
query ListProductsCategoryAndUom {
  allProducts {
    nodes {
      sku
      description
      categoryByCategoryId {
        description
      }
      uomByUomId {
        name
        abbrev
      }
    }
  }
}
The beauty of this is we can do that in a single query!
In fact, we could return multiple sets of data not directly related or consolidated in a single query:
# Retrieves all the Products and Suppliers options
query AvailableProductsAndSuppliers {
  allProducts {
    nodes {
      sku
      description
      uomByUomId {
        abbrev
      }
    }
  }
  allSuppliers {
    nodes {
      name
      address
    }
  }
}
Now, why don’t we play around with a filter? Filters can be added to a query by placing a condition in brackets after the object of the query. For example:
# Retrieves the products with SKU of "ZYX987"
query AvailableProductsAndSuppliers {
  allProducts(condition: { sku: "ZYX987" }) {
    nodes {
      sku
    }
  }
}
Note: there are some interesting plugins in the PostGraphile ecosystem. For example, to see advanced filtering options, check this plugin.
One of the most highlighted features of a GraphQL API is the possibility to avoid over-fetching data. Traditionally, developers had to rely on creating custom logic and response types to only return what was requested or, return a standard response that might end up containing additional information that wasn’t required. With GraphQL, since you’re explicitly requesting what you need, the response will have exactly what has been requested.
We are just scratching the surface here – there are lots of other queries and options to explore and interesting features that can be utilized in GraphQL, like Fragments, Directives, Types, Introspection, etc., but it’s beyond the scope of this tutorial.
Note: it’s important to highlight the concept of an entity’s Connection in PostGraphile. Usually when you’re retrieving lists (like allProducts, allSuppliers, etc.) you’ll see that it returns an entity Connection (ProductsConnection, SuppliersConnection, etc.). You can find more about this here.
Writing GraphQL Mutations
If we think in terms of CRUD operations, GraphQL Mutations are the Create, Update and Delete features.
To see it in action, we can test it out by using the Mutations that are already available.
Let’s create a Product:
mutation {
  createProduct(
    input: {
      product: {
        description: "A Test Product"
        uomId: 1
        categoryId: 1
        subcategoryId: 1
      }
    }
  ) {
    product {
      nodeId
      id
    }
  }
}
Note: we’re asking for the product id and nodeId in the response.
Wait! Something “unexpected” happened:
{
  "errors": [
    {
      "message": "Field \"ProductInput.sku\" of required type \"String!\" was not provided.",
      "locations": [
        {
          "line": 3,
          "column": 14
        }
      ]
    }
  ]
}
Just by reading the error message, it’s obvious that the SKU is required (this is specified in our Product entity). Let’s fix it by adding the required field:
mutation {
  createProduct(
    input: {
      product: {
        sku: "XXX1"
        description: "A Test Product"
        uomId: 1
        categoryId: 1
        subcategoryId: 1
      }
    }
  ) {
    product {
      nodeId
      id
    }
  }
}
After running this mutation, a new product with the provided details will be created in the database. If the mutation has run successfully, you’ll see a nodeId and id value similar to below. Note that your nodeId and id value may differ from the one shown and that’s ok.
{
  "data": {
    "createProduct": {
      "product": {
        "nodeId": "WyJwcm9kdWN0cyIsNF0=",
        "id": 4
      }
       }
   }
}
Note that the nodeId that was requested in the response. We’re going to reuse it in the next mutation. Now, if we need to update its description, let’s call the mutation to update it:
mutation {
  updateProduct(
    input: {
      nodeId: "*** INSERT THE nodeId in here ***"
      productPatch: { description: "A new description" }
    }
  ) {
    product {
      id
      nodeId
      description
    }
  }
}
Then, if we realize that this product shouldn’t be available in our catalog anymore, we can easily delete it by using the following mutation:
mutation {
  deleteProduct(input: { nodeId: "*** INSERT THE nodeId in here ***" }) {
    deletedProductId
  }
}
In case you need to retrieve the nodeId of the existing Products, run the following query:
query ProductsNodeIds {
  allProducts {
    nodes {
      nodeId
      id
      description
    }
  }
}
This summarizes some of the great built-in features that our back-end already provides.
Validation
Another aspect of GraphQL is having a mechanism that enforces validation of the query, without having to rely on a runtime check.
Validation can happen at various levels, including type mismatches, missing required parameters and validating if the requested properties exist in the GraphQL schema.
More information about this can be found in the official GraphQL specs.
Completing the configuration of our Entities
There are some missing pieces in the definition of our entities, so it’s a good time for us to finish wiring them. Let’s start by adding a new InventoryTransaction entity that represents an inventory transaction between a given Product in a given Warehouse. So, the next step is to create an /entity/InventoryTransaction.ts file with the following content:
import { Product } from './Product'
import { Entity, Column, PrimaryGeneratedColumn, ManyToOne } from 'typeorm'
import { Warehouse } from './Warehouse'

export enum TransactionType {
 RECEIVE = 'receive',
 WITHDRAW = 'withdraw'
}

@Entity()
export class InventoryTransaction {

 @PrimaryGeneratedColumn()
 id: number

 @Column()
 date: Date

 @Column()
 quantity: number

 @Column({ type: "enum", enum: TransactionType })
 type: TransactionType

 // InventoryTransaction has one Warehouse
 @ManyToOne(() => Warehouse, warehouse => warehouse.inventoryTransactions, { nullable: false })
 warehouse: Warehouse

 // InventoryTransaction has one Product
 @ManyToOne(() => Product, product => product.inventoryTransactions, { nullable: false })
 product: Product

}
Next, we will define the SupplierProduct entity with the association between Suppliers and Products. We should create a /entity/SupplierProduct.ts containing this:
import { Entity, Column, PrimaryGeneratedColumn, ManyToOne } from 'typeorm'
import { Product } from './Product'
import { Supplier } from './Supplier'

/**
 * This entity represents the association between Products and Suppliers in a N:N relationship
 */
@Entity()
export class SupplierProduct {
  @PrimaryGeneratedColumn()
  id: number

  @Column()
  supplierSku: string

  @ManyToOne(() => Product, (product) => product.supplierProducts, { nullable: false })
  product: Product

  @ManyToOne(() => Supplier, (supplier) => supplier.supplierProducts, { nullable: false })
  supplier: Supplier
}
There is one additional entity to be added: WarehouseStock that represents the current stock of a given Product in a Warehouse. To do this, create a /entity/WarehouseStock.ts containing this:
import { Entity, Column, ManyToOne, PrimaryColumn } from 'typeorm'
import { Product } from './Product'
import { Warehouse } from './Warehouse'

/**
 * This entity represents the current stock quantity of a given Product in a Warehouse.
 * Note: since we already have the ManyToOne relationship between warehouse & product, by defining
 * the productId & warehouseId (same name as the one created in the relationship) as PKs, we are basically
 * creating a Constraint with those properties - meaning that we can't have WarehouseStock records without both.
 */
@Entity()
export class WarehouseStock {

  @PrimaryColumn()
  productId: number

  @PrimaryColumn()
  warehouseId: number

  @ManyToOne(() => Product, product => product.warehouseStocks, { nullable: false })
  product: Product

  @ManyToOne(() => Warehouse, warehouse => warehouse.warehouseStocks, { nullable: false })
  warehouse: Warehouse

  @Column()
  quantity: number

}
Finally, we’ll need to tweak our Product, Supplier and Warehouse entities to reflect the associations we recently created. To do this, update those files with the following content:
/entity/Product.ts:
import { Entity, Column, PrimaryGeneratedColumn, ManyToOne, OneToMany } from 'typeorm'
import { Category } from './Category'
import { Subcategory } from './Subcategory'
import { Uom } from './Uom'
import { SupplierProduct } from './SupplierProduct'
import { WarehouseStock } from './WarehouseStock'
import { InventoryTransaction } from './InventoryTransaction'

@Entity()
export class Product {
 @PrimaryGeneratedColumn()
 id: number

 @Column()
 sku: string

 @Column()
 description: string

 // Product has one Category
 @ManyToOne(() => Category, category => category.products, { nullable: false })
 category: Category

 // Product can have one Subcategory
 @ManyToOne(() => Subcategory, subcategory => subcategory.products, { nullable: true })
 subcategory: Subcategory

 // Product has one UOM
 @ManyToOne(() => Uom, uom => uom.products, { nullable: false })
 uom: Uom

 // Product can be associated with many Suppliers
 @OneToMany(() => SupplierProduct, supplierProduct => supplierProduct.product)
 supplierProducts: SupplierProduct[]

 // Product can be associated with many WarehouseStocks
 @OneToMany(() => WarehouseStock, warehouseStock => warehouseStock.product)
 warehouseStocks: WarehouseStock[]

 // Product can be associated with many InventoryTransactions
 @OneToMany(() => InventoryTransaction, inventoryTransactions => inventoryTransactions.product)
 inventoryTransactions: InventoryTransaction[]

}
/entity/Supplier.ts:
import { Entity, Column, PrimaryGeneratedColumn, OneToMany } from 'typeorm'
import { SupplierProduct } from './SupplierProduct'

@Entity()
export class Supplier {
  @PrimaryGeneratedColumn()
  id: number

  @Column()
  name: string

  @Column()
  address: string

  // Supplier can be associated with many Products
  @OneToMany(() => SupplierProduct, supplierProduct => supplierProduct.supplier, { nullable: true })
  supplierProducts: SupplierProduct[];

}
/entity/Warehouse.ts:
import { Entity, Column, PrimaryGeneratedColumn, OneToMany } from 'typeorm'
import { WarehouseStock } from './WarehouseStock'
import { InventoryTransaction } from './InventoryTransaction'

@Entity()
export class Warehouse {
  @PrimaryGeneratedColumn()
  id: number

  @Column({ nullable: false })
  name: string

  // Warehouse can be associated with many WarehouseStocks
  @OneToMany(() => WarehouseStock, warehouseStock => warehouseStock.product)
  warehouseStocks: WarehouseStock[];

  // Warehouse can be associated with many InventoryTransactions
  @OneToMany(() => InventoryTransaction, inventoryTransactions => inventoryTransactions.warehouse)
  inventoryTransactions: InventoryTransaction[];

}
Handling Custom Business Logic for the Back-end
As you probably noticed, PostGraphile exposes default CRUD operations in our DB. Often, however, this may not be enough for a variety of use cases that involve handling business logic inside an application.
In fact, some GraphQL APIs don’t even want to expose these CRUD operations as it might be utilized indiscriminately and/or for security purposes, so it’s opted to disable them (or a part of it) by default.
For this reason, we may want to expose custom Mutation types in a way that enables our back-end to have control over what is going to be processed and handling the actual business logic.
In our sample project, there is one use case for this: we want our back-end to handle registering inventory transactions and carry out updates immediately in a warehouse stock when that happens – all of that wrapped in a database transaction!
There are a couple of ways to achieve this. For instance, in PostGraphile we can extend our Schema by introducing custom mutations with the makeExtendSchemaPlugin utility.
First, let’s install the graphile-utils to take advantage of that:
1npm install graphile-utils@^4.12.3
Next, let’s a create a /service folder under the src directory and create the following file: /service/inventory.ts
import { TransactionType, InventoryTransaction } from '../entity/InventoryTransaction'
import { Warehouse } from '../entity/Warehouse'
import { AppDataSource } from '../data-source'
import { Product } from '../entity/Product'
import { WarehouseStock } from '../entity/WarehouseStock'

// Instantiate the repositories
const productRepository = AppDataSource.getRepository(Product)
const warehouseRepository = AppDataSource.getRepository(Warehouse)
const warehouseStockRepository = AppDataSource.getRepository(WarehouseStock)

export type TransactionDetails = {
 transactionId: number,
 productId: number,
 warehouseId: number,
 updatedQuantity: number,
}

/**
* Register a inventory transactions and updates the warehouse stocks.
* @param type type of transaction.
* @param productId product that are going to be transacted .
* @param warehouseId target warehouse that the quantity is going to be updated.
* @param quantity quantity for this transaction.
* @returns a object containing relevant information about the transaction details.
*/
export const registerTransaction = async (type: TransactionType, productId: number, warehouseId: number, quantity: number): Promise<TransactionDetails> => {
 // Verify and retrieve the information about the Product and Warehouse
 const product = await productRepository.findOneByOrFail({ id: productId })
 const warehouse = await warehouseRepository.findOneByOrFail({ id: warehouseId })

 // Creates a InventoryTransaction
 const transaction = new InventoryTransaction()
 transaction.date = new Date()
 transaction.quantity = quantity
 transaction.type = type
 transaction.product = product
 transaction.warehouse = warehouse

 // Updates the warehouse stock based on the transaction
 const warehouseStock = await warehouseStockRepository.findOneBy({ productId: product.id, warehouseId: warehouse.id }) || new WarehouseStock()
 if (!warehouseStock.productId || !warehouseStock.warehouseId) {
   // There is no stock records for the given product and warehouse yet. Will create one.
   warehouseStock.productId = product.id
   warehouseStock.warehouseId = warehouse.id
   warehouseStock.quantity = 0
 }
 // Update the stock quantity
 warehouseStock.quantity = warehouseStock.quantity + (type === TransactionType.RECEIVE ? quantity : -quantity)

 // Save the information within a transaction
 await AppDataSource.transaction(async (transactionalEntityManager) => {
   await transactionalEntityManager.save(transaction)
   await transactionalEntityManager.save(warehouseStock)
 })

 return {
   transactionId: transaction.id,
   updatedQuantity: warehouseStock.quantity,
   warehouseId: warehouse.id,
   productId: product.id,
 }
}
This service is responsible for the business logic of registering inventory transactions and updating the warehouse stocks.
Now, we need to integrate it with our GraphQL API and make it available for use. Let’s tweak our /App.ts by adding the following code right after the existing imports:
import { makeExtendSchemaPlugin, gql } from "graphile-utils"
import { registerTransaction } from './service/inventory'

const RegisterTransactionPlugin = makeExtendSchemaPlugin(_build => {
 return {
   typeDefs: gql`
     input RegisterTransactionInput {
       type: InventoryTransactionTypeEnum!
       productId: Int!
       warehouseId: Int!
       quantity: Int!
     }

     type RegisterTransactionPayload {
       transactionId: Int,
       productId: Int,
       warehouseId: Int,
       updatedQuantity: Int,
     }

     extend type Mutation {
       registerTransaction(input: RegisterTransactionInput!): RegisterTransactionPayload
     }
   `,
   resolvers: {
     Mutation: {
       registerTransaction: async (_query, args, _context, _resolveInfo) => {
         try {
           const { type, productId, warehouseId, quantity } = args.input
           const inventoryTransaction = await registerTransaction(type, productId, warehouseId, quantity)
           return { ...inventoryTransaction }
         } catch (e) {
           console.error('Error registering transaction', e)
           throw e
         }
       }
     }
   },
 };
});
The logic here is quite simple: we’re extending our GraphQL Schema (with typeDefs) by defining a new Mutation along with the expected Inputs and the response Payload for that mutation. There is also the definition of a resolver function, which tells GraphQL how to populate the registerTransaction data. The resolver function we are calling is the registerTransaction function from /service/transaction.ts.
Now we need to add the following code that registers it on the PostGraphile middleware configuration:
app.use(postgraphile(`postgresql://${pgUser}@localhost/catalog_db`, 'public', {
   watchPg: true,
   graphiql: true,
   enhanceGraphiql: true,
   appendPlugins: [RegisterTransactionPlugin],
 }))
With this in place, we’re basically registering our custom plugin for extending our Schema to include the new registerTransaction mutation.
Testing our GraphQL API
First, let’s make sure our custom mutation is present. In case your server isn’t running, it’s time to spin it up again:
1npm run start
2
Now, let’s go to our GraphQL Playground endpoint and check if the custom mutation is present by opening http://localhost:8090/graphiql in your browser.
Click on the Docs section and then in the Mutation option. If you scroll down to the bottom, you should be seeing this:

That’s it! We’ve now successfully wired our custom mutation that wraps up our business logic. Now, let’s try out some queries for testing purposes:
query MyQuery {
  allInventoryTransactions {
    nodes {
      id
      productId
      warehouseId
      quantity
    }
  }

  allWarehouseStocks {
    nodes {
      productId
      warehouseId
      quantity
    }
  }
}
If you haven’t played around by creating some test InventoryTransactions and WarehouseStocks, you should be seeing empty results.
As a next step, let’s register an inventory transaction by calling our mutation:
mutation {
  registerTransaction(
    input: { productId: 2, warehouseId: 1, quantity: 2, type: RECEIVE }
  ) {
    transactionId
    updatedQuantity
    warehouseId
    productId
  }
}
In this example, we’re registering a transaction with the following information:
We should expect that an InventoryTransaction was made, along with an update in our WarehouseStock.
We can verify this by running our previous query.
Wrap-Up and What’s Next in our Full-Stack App Tutorial:
That’s a wrap! In part two, we walked through additional setup in our back-end, some of the key concepts of GraphQL and the implementation details of our demo App. Our back-end is now prepared to serve our React front-end!
In the next part of this tutorial series, we’ll explore more Mutations and Queries and build the functionality of our demo app. Stay tuned to see how we’re going to build our front-end client and integrate it with our back-end!
- 登录 发表评论