创建具有完全动态内容的侧导航的详细指南

TL;DR
We define a dynamic content area and select it using a directive. We define a stack for storing sidenavs which is accessed by a service, then we set it up so that the top sidenav in the stack is the one displayed in the dynamic content area.
Intro
Jira has a very fancy sidenav. It shows you different content based on what page you’re in. It’s different if you’re in the dashboard vs in reporting or settings, etc.
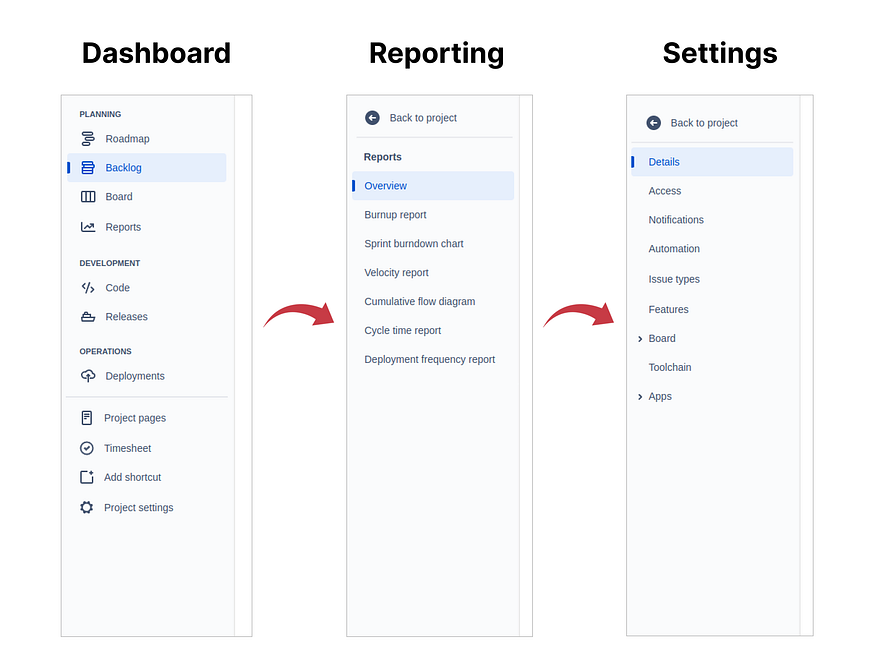
This is very handy. It allows the user to gain access to all the sections relevant within the context of the page they’re in.
Now this is very nice for the user and all, but how do we make it so that the process has as little friction as possible for us as developers?
In this article, we go through step-by-step explaining how to create a sidenav with this dynamic content behavior in a way that makes it easy for the developer to use, inspired by the fantastic Angular Material library.
This article builds on top of the base sidenav we implemented in this article:
The Ultimate Sidenav Guide with Angular: Resizeable, Dynamic, and Toggleable
Create a Versatile Sidenav that supports Resizing, Toggling, and Dynamic Content
Explanation
Before getting into the actual coding, I think it’ll help if we talk about how this can be done in a more abstract way.
Usually, we have a static configuration like this:

We would configure a sidenav and it’d be the same everywhere in the app. We might setup our layout like in the above configuration where the sidenav is on the left and the main content is on the right. Both the content and position of the sidenav are static.
In our case though, we want to be able to change the sidenav’s content but not its position. So, we can think of it like this:

We still have one static sidenav, but the content inside of it will be change-able by us. In other words, we need a way to set an element inside the sidenav area as this change-able area. (Spoilers: we’re going to use a Directive for that)
Next, we need an easy way to change the content within our designated area. But how do we decide what’s easy?
Let’s think about it. When does the content inside a sidenav change? I’ve come to see that it changes in three situations:
- When the user first opens the app
- When the user opens a section of the app with its own sidenav
- When the user navigates away from a section of the app with its own sidenav
The first one is straight-forward. Set your main sidenav, the one with all the high-level links and profile drop-menus and all of that jazz, when the app first opens. You don’t care about previous content in the sidenav as there wasn’t any before. It’s a simple “just put this here” sort of situation.
The second and third situations are a bit more tricky. When the user navigates to a new section, we want to set a new sidenav without needing to know about what was there before.

Likewise, when we need to navigate away from the page, we need to simply be able to sort of pop off the current sidenav to reveal the one before it, without necessarily knowing which one was before it.
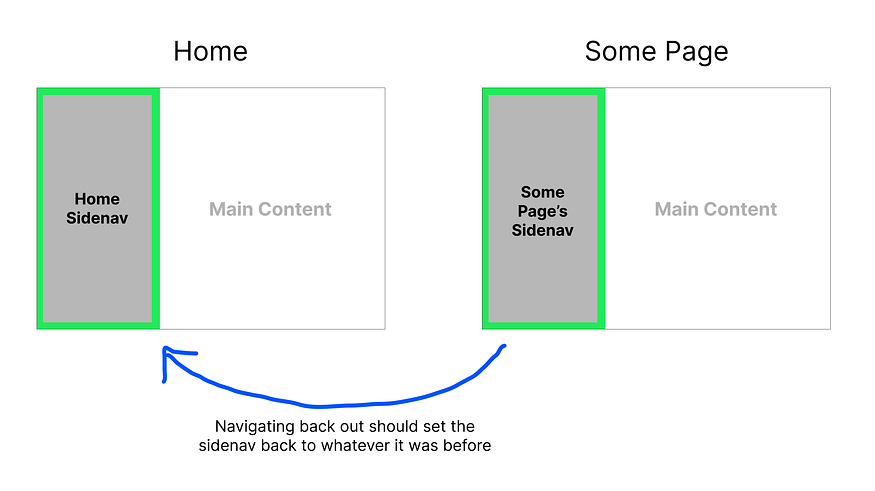
That’s an interesting word, pop. Brings to mind that data structures class you might have taken in your college days (or maybe you’re still taking it). So you guessed it, we’re using a stack!
More specifically, we’re implementing a first-in, last-out type stack. Whatever the top sidenav in the stack is, that’s the sidenav we’ll be displaying.
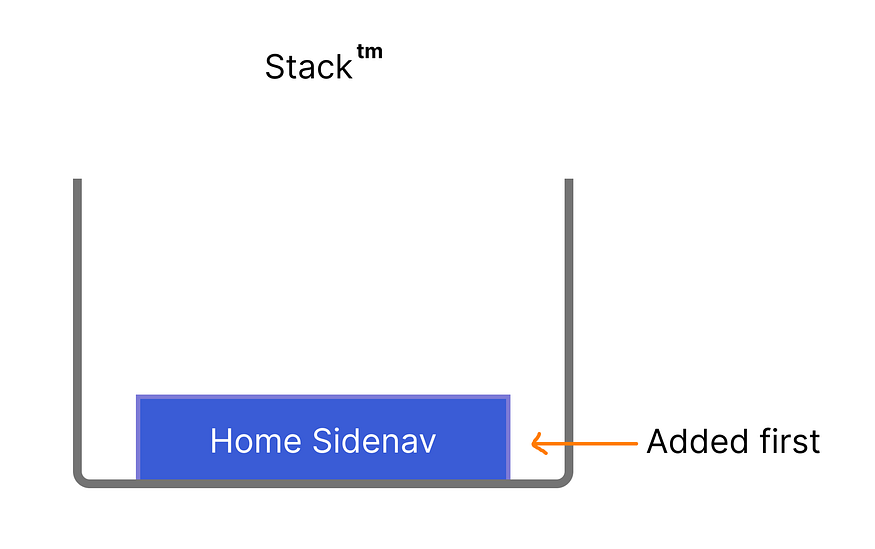
The idea is the following: You have a default sidenav menu that’s the first element of your stack. This one never leaves the stack. Next, whenever you open a page that needs to have its own sidenav, you push that sidenav onto the stack.
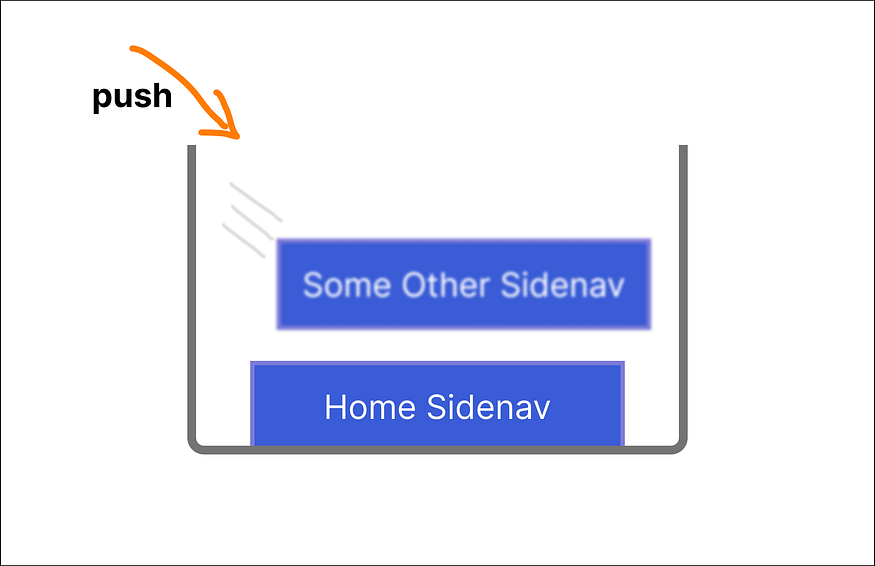
When leaving any page that has set its own sidenav, we call the pop method, causing the sidenav that’s been added to be thrown off the stack, and leaving the sidenav just before it, whatever that sidenav happened to be, on top of the stack again. This way, pages only have to keep track of their own sidenavs.
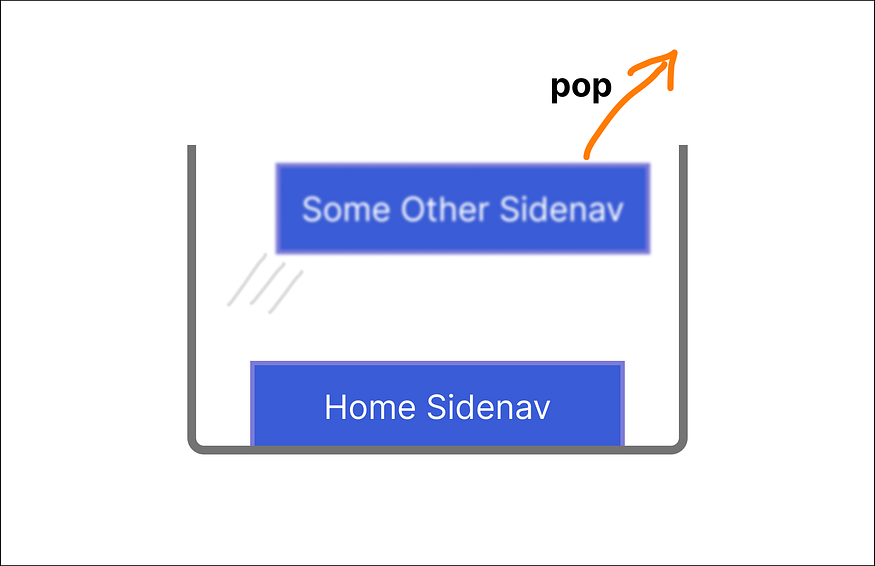
A stack also helps us support nested dynamic sidenavs. Think of a default sidenav leading to a settings page that has its own sidenav which has a security settings page that also has its own sidenav.
When leaving the security settings, you would just want to go back to the general settings’ sidenav, and a stack lets us do this without having to know about what sidenav was present before the current one.
So, to recap, we use a stack for the following reasons:
- I learned about it at school years ago and really wanted to use it once in my life.
- the push-pop logic allows pages to care only about their own sidenavs.
Implementation
For the implementation, we will need the following:
- a
Directiveto help us define the dynamic content area - a basic stack implementation for keeping track of the current sidenav
Step 1: Defining the Content Area with an Angular Directive
Let’s start with defining our dynamic content area.
Using a directive will allow us to mark an element with a selector as well as have access to that element’s ViewContainerRef property which we will be using in just the next step.
The directive is as simple as can be. Create a file named sidenav-content-area.directive.ts right under app/components/sidenav :
@Directive({
  selector: '[sidenavContentArea]',
})
export class SidenavContentAreaDirective {
  constructor(public viewContainerRef: ViewContainerRef) {}
}
Don’t forget to add it to the declarations in AppModule.
Now that we have directive, let’s use it! We’ll be making changes in sidenav.component.html. To start, replace the whole file with the following:
<div class="sidenav-body-container">
  <ng-template sidenavContentArea></ng-template>
</div>
When the implementation is finished, whatever new content we set will replace the <ng-template> so let’s keep that in mind, semantically speaking.
For now, this is all we need to do in this file. We’re ready to implement our stack.
Step 2: Setting Up the Stack
We’re going to implement the stack in sidenav.service.ts because that’s where we control the sidenav throughout the app.
The first question is what type of thing is our stack going to store? The answer is your good ol’ angular Component type.
So far, I’ve ignored adding imports because your IDE can take care of that for you. This one is a bit of an exception, so add this line to sidenav.service.ts first:
import type { Type as Component } from '@angular/core';
Angular’s type for a component is counter-intuitively called Type. This import statement grabs it and assigns to the Component alias so the code where we use it is more readable.
Remember:
`import type { ... }` in TypeScript imports type declarations only, ensuring type safety without affecting runtime code or bundle size.
Now, let’s get to implementing the stack itself. The stack is really just the following code:
export class SidenavService {
  #stack = [] as Component<unknown>[];

  push(component: Component<unknown>): void {
    this.#stack.push(component);
  }

  pop(): void {
    // At least one item must be in the
    // stack so user isn't left with an empty sidenav
    if (this.#stack.length === 1) {
      return;
    }

    this.#stack.pop();
  }
}
Now that we have a fully functional stack, let’s see about how we’ll access the dynamic content area.
First, let’s create a variable to access and store it. We can add this variable right above the #stack variable:
export class SidenavService {
  #contentArea?: SidenavContentAreaDirective;

  #stack = [] as Component<unknown>[];

  // ...
}
The variable contentArea has the type of our directive which allows us access to the ViewContainerRef as we implemented before.
There are a few more things to add now. First, the variable is nullable because we don’t actually have a way to assign a value for it right from the start.
We’ll need to define a method in the service that the sidenav component can call and pass on the dynamic area element that way.
We can place this method just before the push method in sidenav.service.ts:
// ...

  setDynamicContentArea(host: SidenavContentAreaDirective) {
    this.#contentArea = host;
  }

  push(component: Component<unknown>): void {
// ...
Now, this method will be called in sidenav.component.ts as soon as the view is generated. Add the following to sidenav.component.ts:
export class SidenavComponent {
  @ViewChild(SidenavContentAreaDirective, { static: true })
  sidenavContentArea?: SidenavContentAreaDirective;

  constructor(public sidenavService: SidenavService) {}

  ngOnInit(): void {
    if (!this.sidenavContentArea) {
      throw new Error('sidenavContentArea is undefined');
    }

    this.sidenavService.setDynamicContentArea(this.sidenavContentArea);
  }
}
We select the directive as a ViewChild, then pass it over to the sidenav service after checking it’s there. Since we marked it as static in the ViewChild decorator, we can access it in ngOnInit with no issues.
Great! We’re doing the final bit of implementation in the sidenav.service.ts file. We now have a stack and a content area, so we just need to update the content area when the stack is updated.
We need a method to place a given component in the dynamic content area. Here’s a method that does just this (we can place it under the pop method):
#setContent(component: Component<unknown>): void {
    this.#contentArea?.viewContainerRef.clear();

    this.#contentArea?.viewContainerRef.createComponent(component);
  }
This method does 2 things:
- Clears the current content
- Creates and assigns a new component into its area
Then, we update the push and pop methods like this:
push(component: Component<unknown>): void {
    this.#stack.push(component);
    this.#setContent(component);
  }

  pop(): void {
    // At least one item must be in the
    // stack so user isn't left with an empty sidenav
    if (this.#stack.length === 1) {
      return;
    }

    this.#stack.pop();

    // The current top of the stack is set as the new sidenav
    this.#setContent(this.#stack[this.#stack.length - 1]);
  }
We’re done! Now let’s see how we can use this thing.
Step 3: Usage Examples
You’ll notice that currently the sidenav is looking like a ghost town:

This is because we have gone and defined a dynamic area and a stack and all of that fancy stuff, but we never actually placed a sidenav there!
So let’s start with that. First, let’s create a component to place in the sidenav. We’ll create this one under components/sidenavs/default-sidenav as default-sidenav.component.ts:
@Component({
  template: `
    <h1>Sidenav</h1>

    <app-sidenav-link routerLink="/home">
      <mat-icon icon>home</mat-icon>

      Home
    </app-sidenav-link>

    <app-sidenav-link routerLink="/settings">
      <mat-icon icon>settings</mat-icon>

      Settings
    </app-sidenav-link>
  `,
})
export class DefaultSidenavComponent {}
Don’t forget to also declare it in the AppModule declarations section so the app-sidenav-link usage is valid.
Now, we can use it in app.component.ts like this:
export class AppComponent implements AfterViewInit, OnDestroy {
  constructor(
    public sidenavService: SidenavService,
    private cdr: ChangeDetectorRef,
  ) {}

  ngAfterViewInit(): void {
    this.sidenavService.push(DefaultSidenavComponent);
    this.cdr.detectChanges();
  }

  ngOnDestroy(): void {
    this.sidenavService.pop();
  }
}
The sidenav service is injected in the constructor first. Then we have a pattern which will be repeated in every page that has its own sidenav.
The sidenav component is pushed in the ngAfterViewInit life-cycle method, and destroyed in the ngOnDestroy method (though technically not needed for app-component, I included the on-destroy hook for the sake of example).
Note that the change detector ref is only necessary when calling in app.component which we’ll be doing only this one time. You’ll see in the upcoming usage that we don’t need it again.
Et voila! We have a sidenav displayed now:

What if we made the settings screen display a different sidenav? Let’s do it real quick.
We create a sidenav component under app/sidenavs/settings-sidenav called settings-sidenav.component.ts:
import { Component } from '@angular/core';

@Component({
  template: `
    <h1>Sidenav</h1>

    <app-sidenav-link routerLink="/">
      <mat-icon icon> arrow_back </mat-icon>

      Back
    </app-sidenav-link>

    <app-sidenav-link routerLink="/settings">
      <mat-icon icon> person </mat-icon>

      Account
    </app-sidenav-link>

    <app-sidenav-link routerLink="/settings">
      <mat-icon icon> security </mat-icon>

      Security
    </app-sidenav-link>

    <app-sidenav-link routerLink="/settings">
      <mat-icon icon> notifications </mat-icon>

      Notifications
    </app-sidenav-link>
  `,
})
export class SettingsSidenavComponent {}
Don’t forget, this one also needs to be declared in AppModule.
We have an existing component called settings.component.ts which is displayed when we click the Settings link in the default sidenav.
To make our new sidenav display when we open this page, we can add the following to the settings.component.ts:
export class SettingsComponent {
  constructor(public sidenavService: SidenavService) {}

  ngAfterViewInit(): void {
    this.sidenavService.push(SettingsSidenavComponent);
  }

  ngOnDestroy(): void {
    this.sidenavService.pop();
  }
}
And just like that, we get the following when we navigate to and from the settings page:
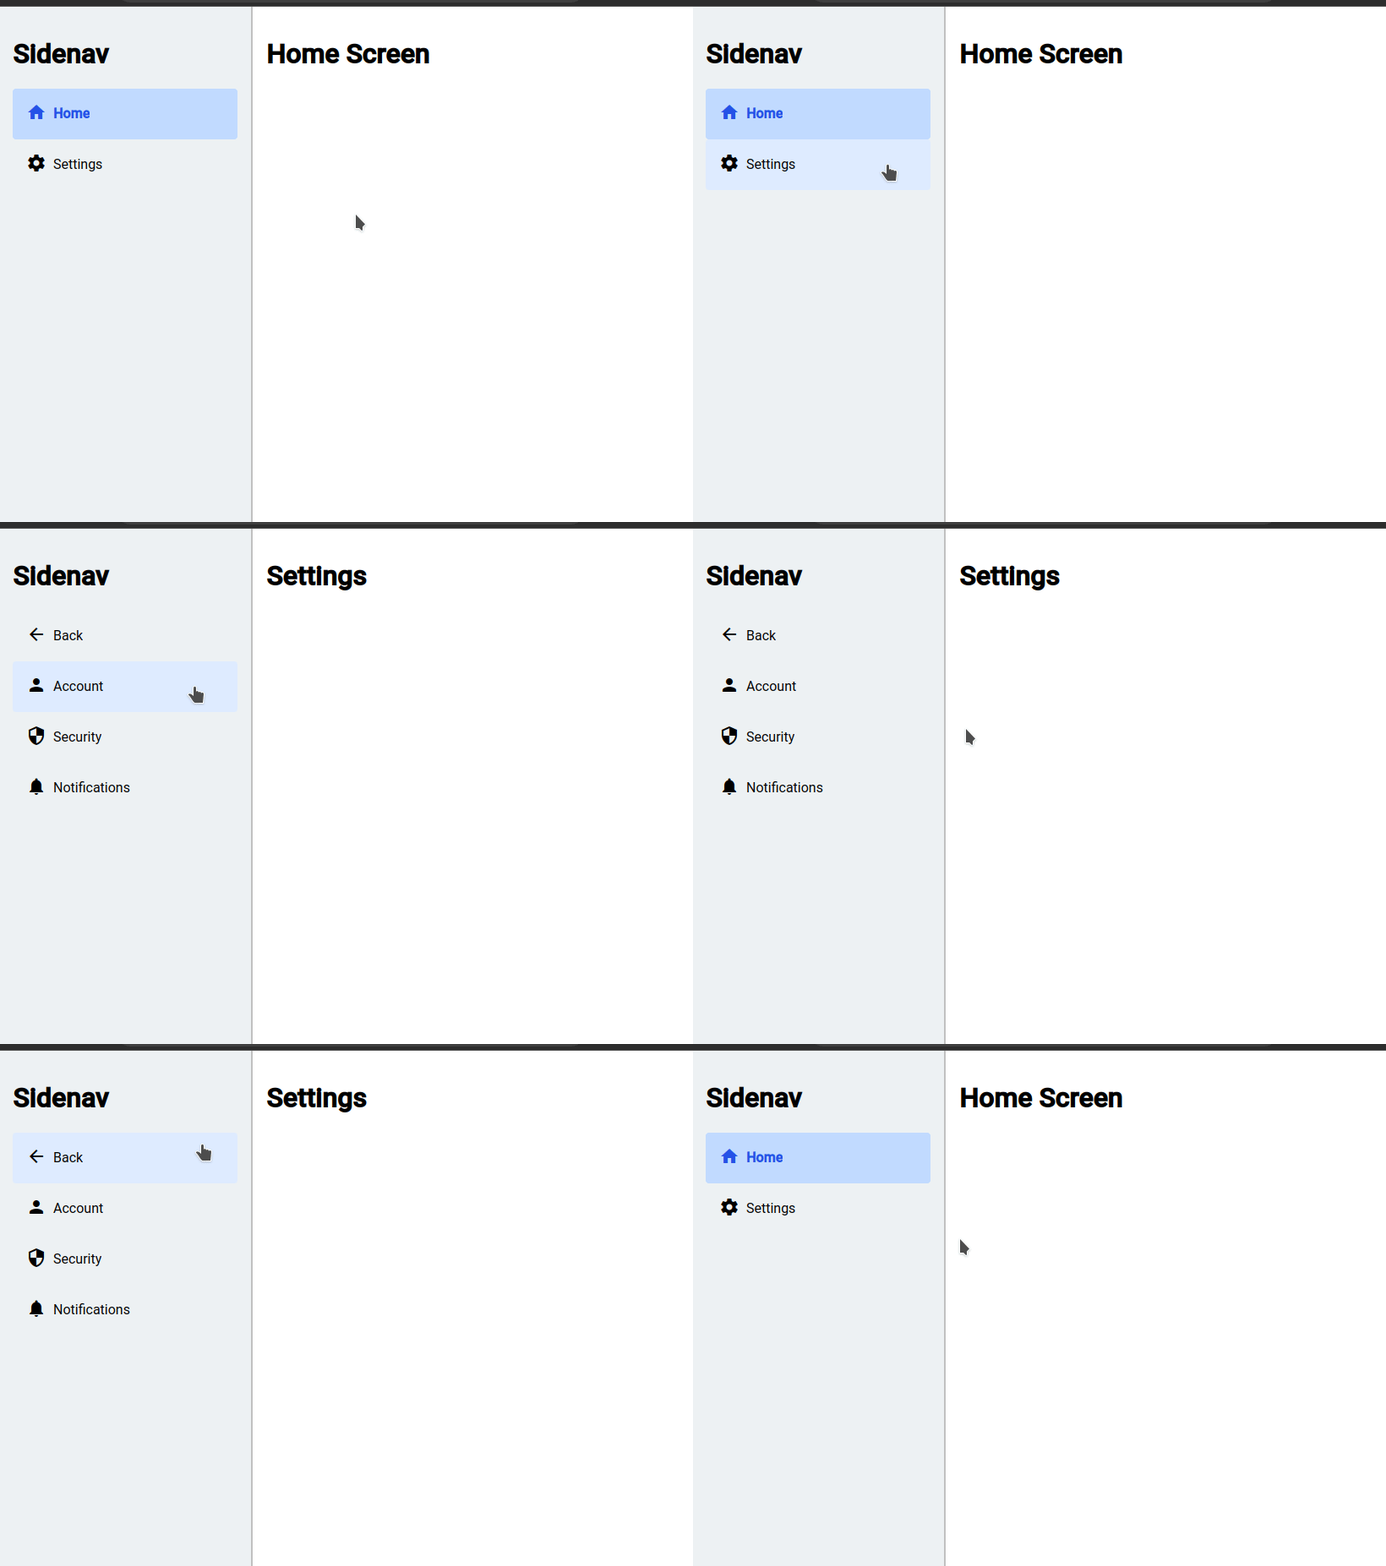
With that, we now have a fully functional dynamic sidenav with a couple of example usages above.
This snappy implementation could well be enough for your use case, but if you want something smoother, then see how we can implement a transition effect in the next step.
Step 4: Animating Sidenav Transitions (Optional)
Animating transitions as sidenavs change is a bit tricky. We can come up with a simple way of doing it though.
Basically, when pushing, we move in a sidenav from the right to indicate the user moving into a deeper section within the site, and out the left when popping to indicate the opposite.
When the animation starts, we’ll instantly place the new sidenav, but have it be hidden on the right or left and make it slide in from the respective side.
Here’s how it will look in the end:
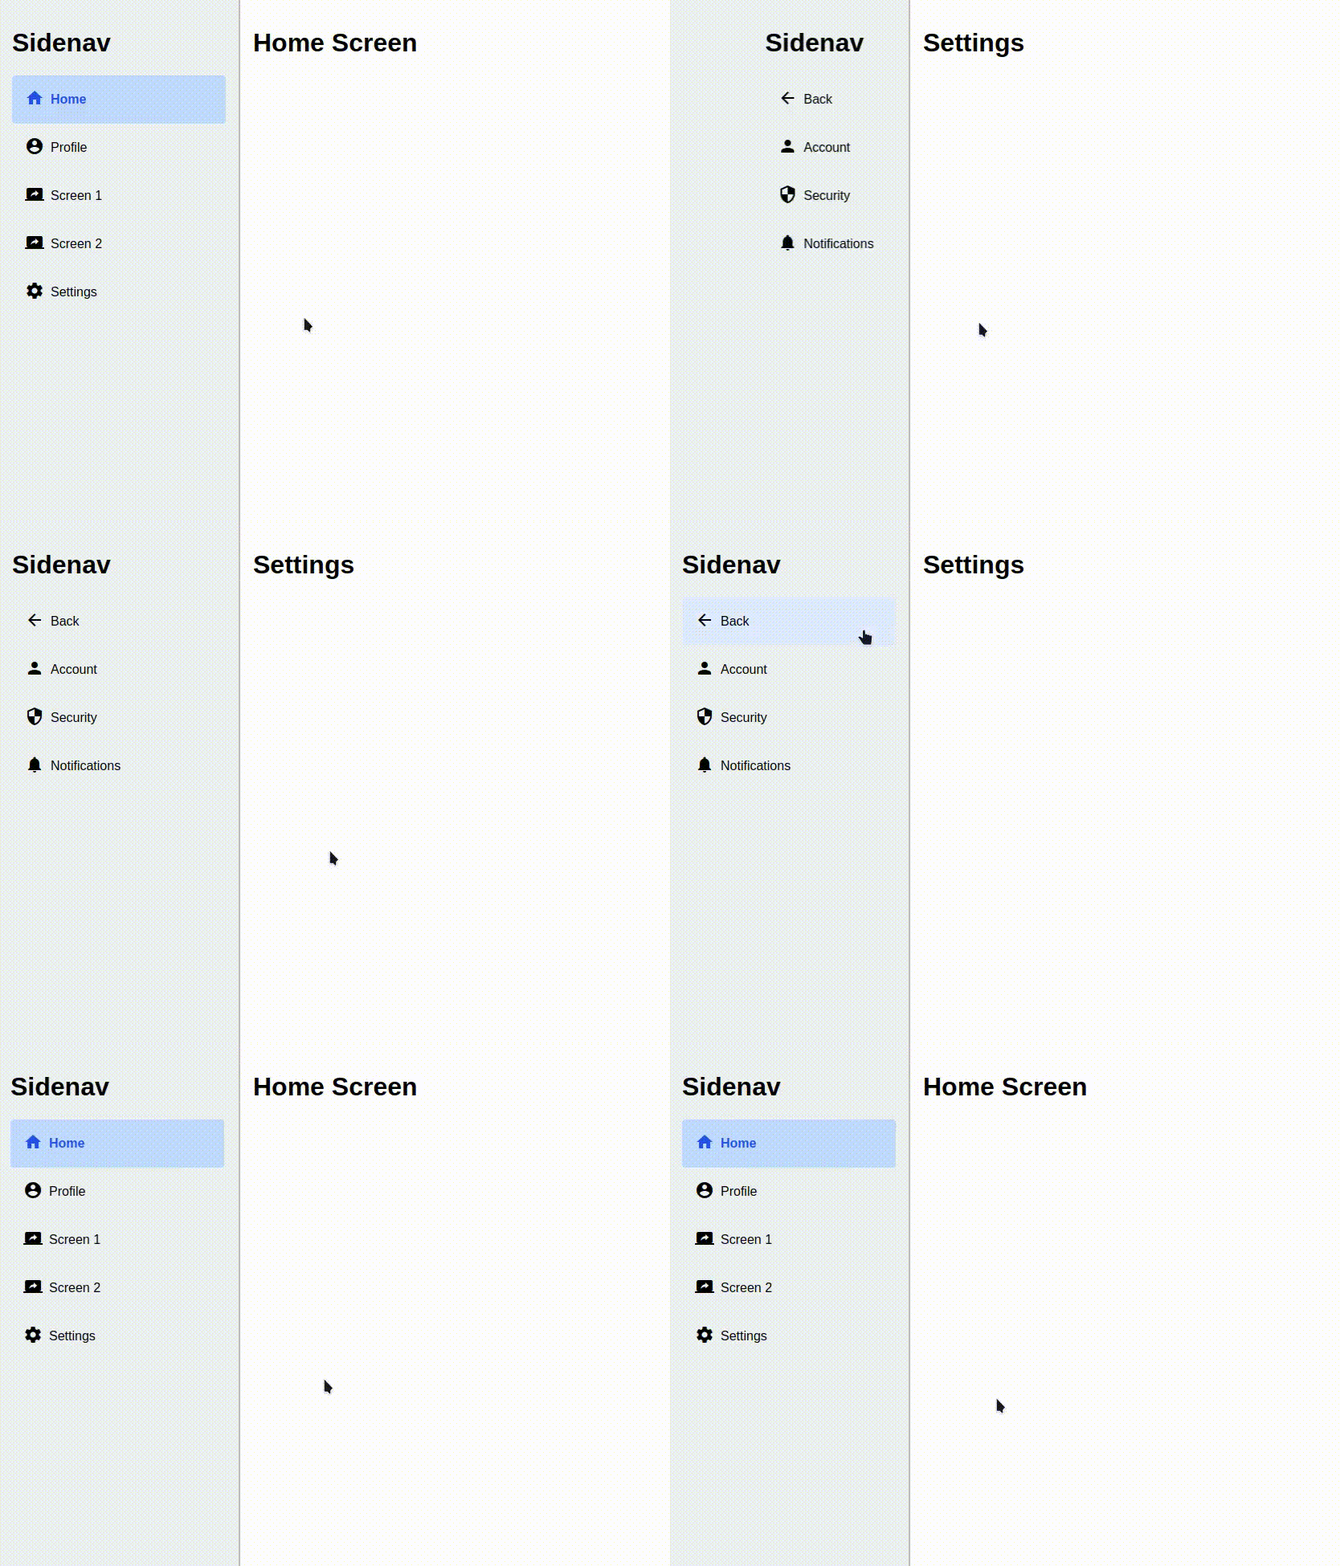
To get started with this, we’ll need a way to tell the content in the sidenav to slide in from the left or right at certain times. We’ll start by creating two new variables in sidenav.service.ts like the following:
export class SidenavService {
  // ...

  #stack = [] as Component<unknown>[];

  // New Variables
  isSlidingInFromRight = false;
  isSlidingInFromLeft = false;

  // ...
}
Next, let’s think about how we want the animation to actually happen. Basically, we will have two parts:
- The sliding in from the left
- The sliding-in from the right
Just before moving on, we’ll have to define a length for the transition animation. Since we’re going to also be using it in the CSS, let’s define it in the CSS first and then import its value in the code.
We can do this by adding the following in the global styles.scss:
:root {
  --sidenav-width: 300px;

  // NEW
  --sidenav-transition-duration: 400ms;
}
Now let’s define a method in the service to access it (sidenav.service.ts):
get sidenavTransitionDuration(): number {
  const sidenavTransitionDurationFromCssVariable = getComputedStyle(
    document.body
  ).getPropertyValue('--sidenav-transition-duration');

  return parseInt(sidenavTransitionDurationFromCssVariable, 10);
}
This method finds the variable we just defined by its name then parses it as a decimal integer.
Using the variable will allow us to keep our transitions synced everywhere. We only have to change this variable in this one place in the CSS to make the transition quicker or slower.
Next, we define a couple of methods to make the transition happen by manipulating the two variables we just created (in sidenav.service.ts ):
async #sleep(ms: number): Promise<void> {
  return new Promise((resolve) => setTimeout(resolve, ms));
}

async #animateInFromTheLeft() {
  this.isSlidingInFromTheLeft = true;

  await this.#sleep(this.sidenavTransitionDuration);

  this.isSlidingInFromTheLeft = false;
}

async #animateInFromTheRight() {
  this.isSlidingInFromTheRight = true;

  await this.#sleep(this.sidenavTransitionDuration);

  this.isSlidingInFromTheRight = false;
}
Let’s break these down. First, the sleep method allows us to halt code execution for a given number of milliseconds. It’s basically a helper util for the next two methods.
Next, #animateInFromTheLeft simply changes the isSlidingInFromTheLeft variable state from true to false with a time delay in between using the #sleep method. It’s the same for #animateInFromTheRight but with isSlidingInFromTheRight instead.
But hold on a second, why are we changing them back to false after the transition duration is over? Good question!
The reason is that if we leave them as true, then when the time comes for running the animation again, it won’t run since we’d be setting a variable storing true to true again, causing Angular’s change detection not to run, and our breathtaking animation to be skipped.
One more step to go and we’ll get to working on the actual animations in CSS. We just need to add usages for these methods when pushing and popping sidenavs.
We can update the push method like so:
async push(component: Component<unknown>): Promise<void> {
  this.#stack.push(component);

  this.#setContent(component);

  await this.#animateInFromTheRight();
}
We made the push method async and added an animateInFromTheLeft call after setting it.
Awaiting the animation isn’t necessary, but it makes the method only return when the animation is actually finished, which might come in handy.
We’ll do the same to the pop method:
async pop(): Promise<void> {
  if (this.#stack.length === 1) {
    return;
  }

  this.#stack.pop();

  this.#setContent(this.#lastStackItem);

  await this.#animateInFromTheLeft();
}
Now onto the styling. Notice how we’ve been making almost everything private so far (preceded by the # symbol). This is because our styles will only need access to the isSlidingInFromTheLeft and isSlidingInFromTheRight variables.
We’ll be modifying the sidenav component’s template and CSS to use these variables.
First, one tiny semantic issue. What are we supposed to be sliding? Let’s take a look at our current template:
<div class="sidenav-body-container">
  <ng-template sidenavContentArea></ng-template>
</div>
It’s obvious we want to move the ng-template element. So we could apply our styles to it, right?
Unfortunately, that’s not going to work since we replace the template with a different element each time.
A straight-forward way to get around this is to wrap it with another element, so our final template looks like so:
<div class="sidenav-body-container">
  <div
    class="sidenav-body"
    [class.slide-in-from-left]="sidenavService.isSlidingInFromLeft"
    [class.slide-in-from-right]="sidenavService.isSlidingInFromRight"
  >
    <ng-template sidenavContentArea></ng-template>
  </div>
</div>
Notice three classes added to the wrapping element: sidenav-body, slide-in-from-left, and slide-in-from-right. The last two are assigned dynamically depending on the variables in the sidenav service.
Last step is to add animations in the styles of the sidenav component. We can add the following in sidenav.component.scss:
@keyframes slideInFromLeft {
  from {
    transform: translateX(-100%);
  }
  to {
    transform: translateX(0);
  }
}

@keyframes slideInFromRight {
  from {
    transform: translateX(100%);
  }
  to {
    transform: translateX(0);
  }
}

.sidenav-body {
  &.slide-in-from-left {
    animation: slideInFromLeft var(--sidenav-transition-duration) ease-out;
  }

  &.slide-in-from-right {
    animation: slideInFromRight var(--sidenav-transition-duration) ease-out;
  }
}
We define two animations, slideInFromLeft and slideInFromRight, then assign them accordingly in the sidenav-body class depending on the classes associated with the sidenav service.
Now we have a fancy dynamic sidenav with animated transitions!
Conclusion
We have implemented an easily controllable sidenav area by defining a dynamic area within an element, setting up a stack to store sidenavs, and displaying the top sidenav within that stack.
We implemented a service to allow us to change content by pushing and popping elements to / from the stack.
Finally, we added transitions to make the UX better for the user.
References
- 登录 发表评论